Stick welding (SMAW or Shielded Metal Arc Welding) is one of the most popular welding processes alongside MIG and TIG. It’s a simple process popular with outdoor welders as it’s not affected by the wind – unlike MIG and TIG welding with gas cylinders. Our comprehensive guide will teach you about the pros and cons of stick welding, how to set up stick welding, the stick welding processes, and troubleshooting tips.

What is stick welding (SMAW)?
Stick welding is performed by starting an arc between a metal electrode and the workpiece. An electric current flow through the electrode and melts it in the workpiece, creating a weld pool. The electrode is covered with a layer of flux that softens the weld pool and protects it from contamination by the atmosphere (in the same way a shielding gas protects it in MIG and TIG).
The flux forms a layer of slag formed on the weld seam and must be broken off and brushed off after the weld seam is complete.
- Stick welding is portable. A small rod welder can work on thick metal, is not very heavy, and does not require a hose reel or additional equipment such as a gas cylinder.
- Stick welding is the best excellent for outdoor circumstances. Gas welding does not give good results in windy conditions.
- It is easier to master than TIG welding, but it does require some knowledge.
- You can weld metal with scale or rust.
- This takes more skill than MIG as you have to keep the electrode a certain distance from the metal while it is firing.
- This creates a lot more spatter and slag.
- A longer cleaning time leads to reduced efficiency.
- The weld is not as complicated or of high quality as TIG.
Getting started – what you need
Safety equipment
When welding, your safety is always the most important thing. You should read and follow all safety information and instructions in the manual for any equipment you use in stick welding.
When welding, you will need body armor to protect yourself from the heat, ultraviolet rays, and sparks generated by the arc. From clothing, long fireproof sleeves preserve your body and goggles, and a welding helmet protects your head and eyes.
Welding should only be carried out with adequate ventilation due to the escaping fumes. If you are outside in a breeze, you will be fine, but inside you need ventilation. The exhaust is the best way to get fumes out of the area.
Welder with a stick
Without a rod welder, you cannot do stick welding. You can either use a multi-purpose welder that allows you to do more than one type of weld, e.g., B. MIG, WIG & Stick. Or you can use a rod-only welder, which is much cheaper.
Many welders are on the market, but the Amico Power Stick welder is the right choice for beginners. Please see our full guide to choosing a rod welder for more information on how to do this.
Grounding clamp
Your ground clamp will typically originate with the welder. It should be plugged into the grip welder and attached to the workpiece.
Slag removal tools
When welding rods, slag is created on your weld seam. Because of this, you need to clean the solder afterward. It is better to use a slag splitter and hammer to remove the slag, then scrub with a wire brush.
Choose your electrode
There are hundreds of different stick electrodes, and you need to choose the one that suits your welding project. The most general are 6010, 6011, 6012, 6013, 7014, 7024, and 7018. Any E60 or E70 electrode is suitable for working with mild steel. The 7018 is probably the most popular electrode of all and creates solid welds, but the 6013 is the right choice for beginners.
To comprehend which electrode to select, you need to understand what each of the four numbers means.
The first two digits designate the minimum tensile strength. For example, a tensile strength electrode at 60,000 psi starts at 60. This should match the strength properties of the base metal.
The third number indicates where the electrode can be used when welding. The number one represents the ability to be used in any position, while number 2 can only be used in a flat place.
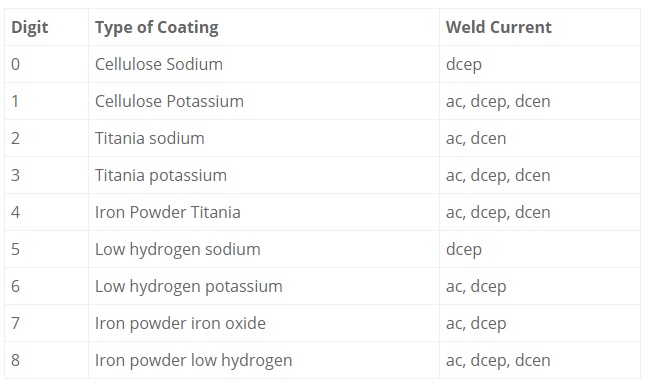
The fourth digit indicates what current you can use for the electrode and the coating of the electrode. We have a reference table for this below.

Stick welding system
Stick welding is a pretty straightforward setup that looks like the picture below. Note that your polarity settings will depend on the electrode you are using. It is, therefore, essential to check whether it is AC / DC- / DC +. First, try some 6013 electrodes on DCEN on a 3/16 inch steel plate.
How to apply your first weld
With everything set up, you are now ready to start a weld. Ensure all the settings are correct, and take some scrap pieces and place them as a butt joint. Stick welding takes a bit of skill, so it’s always best to practice some scrap before jumping in and trying to weld on an actual project.
Strike the bow
As soon as the top electrode is in the electrode holder, switch on the welder. To hit the arc, place the electrode tip on the metal and slide it quickly like you’re hitting a match. If an arc forms, lift the electrode slightly, and you can pull the metal too. Break the electrode pins off the metal by twisting it slightly. If the arc cuts, you have raised the electrode too high from the surface and should have it lower. As soon as the arc is lit, it should sound like fried bacon. If it sounds loud and aggressive, you’ll need to lower the amperage.
Electrode displacement
Once you’ve struck the arc, you’ll need to move the electrode through the joint to complete the weld. Before moving the electrode, you must hold it at the correct angle between 15 and 30% from vertical.
Once you have it at the right angle, you should slowly pull the electrode out towards you. You cannot slide the electrode in as the slag becomes trapped in the weld pool and causes porosity. You have to keep one hand steady. Place your other elbow on the table and hold the hand holding the electrode to stabilize it. Test it multiple times and use the troubleshooting section to resolve any issues at the end of this article.
Other welding positions
If you weld at the top in T angle welding, you must set the angle to about 35% compared to the horizontal. If the angle is not adjusted to push the bead back against gravity, the weld will drop slightly due to gravity.
The more slag, the bigger the angle you will need. If your angle is also minor, the slag will fall into your solder bath and cause solder defects.
Common mistakes and troubleshooting
When you start welding rods, you are likely to make mistakes even if you have MIG or TIG experience. The most common mistakes I see are too long arc, wrong angle of resistance, inappropriate speed, and wrong temperature when welding.
Lots of syringes
There are many reasons why there is too much spatter when welding. One of the most common reasons is that the arc is too long. You should only hold the electrode lightly over the workpiece. Otherwise, the arc cannot focus and jumps irregularly instead of being smooth.
If there is spatter and the arc gives off a roar, the current is likely too high, and you should lower it.
Porosity
One of the leading causes of porosity in a rod weld is that the electrode is at too steep an angle. If you do not keep the slag in the back of the weld pool by pulling the electrode back at an angle, the slag will mix in the puddle and cause porosity.
Undermine
The undercut has a small crater at the bottom of the weld, between the weld and the metal plate, making the weld weaker. If you have played and the solder looks burned out, reduce the amperage as it will be too hot.
Thin solder ball
The ideal weld seam is approximately 2.5 times the electrode diameter. If the weld is narrow, it will not have sufficient penetration. Try slowing down to about half the speed at which you initially pulled the electrode, and you should see better results.
Lumpy solder bump
If you pull the electrode too slowly, the fill metal will pile up and be lumpy. Another cause is that the amperage is too low, limiting penetration and results in the filler metal merely resting on the joint.
Problem starting the arc
If you are having trouble starting the arc, it is because it is too cold and is causing a weak angle. Try increasing it to around 15 amps and see if it’s easier.
Final thoughts
We hope you enjoyed our guide to stick welding. We would be delighted if you could rate it and pass it on.
Related Welding Reviews & Buyer’s Guide:
BEST BUDGET WELDING HELMETS UNDER $100
Best auto darkening welding helmet
Best Welding Helmets for Beginners
TIG WELDING STAINLESS STEEL
Underwater Welding – How Does Underwater Welding Works?
How to Set up a Welding Rig Truck
ESAB SENTINEL A50 WELDING HELMET